 | LES GUIS - THE PHOTOS FROM 2006 |
THE FARM
MY LIFESTYLE
ON MY TRAVELS
There are more links at the top and bottom of each page.
These concern the administration of the site, but you should visit them just the same.
SITE SPONSORS
please support them
![]()


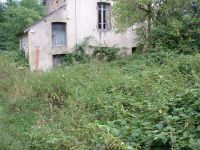
1- This was the view that confronted me as I arrived at the farm. Three years of absence and I wasn't sure what it was that I was expecting, but I certainly wasn't expecting the conifers to have grown quite like this. The one you can see in the foreground is at least 17 feet tall. I know this because I stood on the roof of the Luton Transit, which is 10 feet 6 inches tall, and it towered above me. Is it really only four years ago that this little corner of the farm looked like this?
Some of the conifers are damaged or dead, as I was expecting, but as I've been growing some on my balcony in Brussels as eventual replacements, it's not too much of a loss.

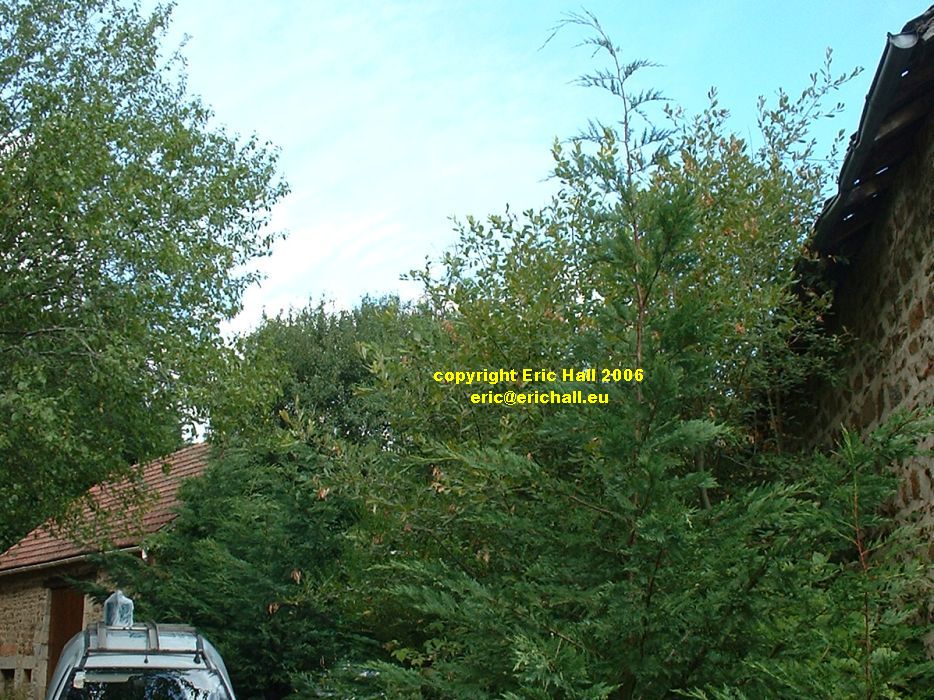
2- This is the view from the end of the lane looking back up the side of the barn. I have to say that all of this is just so impressive. I can foresee a nice pruning job for me next spring, and I shall have a pretty efficient hedge when I've finished. Once the weeds have been tidied, the grass cut and the conifers trimmed, it will all look quite nice here.
One thing that is puzzling me slightly however is the wisdom I had back in those days when I planted the hedge around the Luton Transit. On reflection it probably would have been a better idea to have planted the hedge and then parked the truck behind it. That way I would have been certain that I could get it in and out of the entry space that I left.

3- The next few photos are going to be pretty depressing viewing and will certainly reveal the extent of nature's progress over the last three years.
This by the way, is supposed to be a communal path but as always it has been sadly neglected by the commune who have made no attempt to carry out their obligations in keeping it clear. Makes me wonder why it is that I keep on paying my taxes if every time I come down here it is me that is expected to make a passage down here so that I can arrive at my own property.
Hmmmmmmm. One very unhappy bunny. Time I took matters in hand over this.

4- First job however was to deal with the electricity. To my enormous surprise, there was some element of current still in the old caravan batteries that I had dismissed as knackered three years ago. Nevertheless, with one of the 123-watt solar panels and the real batteries that I had bought last year and the 600-watt inverter I'd acquired, I was aiming for better things and the Transit roof was put to good use once more. You can see that it has done this kind of thing before.
This certainly brightened up my spirits I can tell you, and in more ways than one. I only wish I had grasped the nettle and done this a few years ago.

5- Just as well something did, for this is the view of the house that awaited me. As you can see, it looks like "Brambles 1: House 0" and that everything was reverting back to nature.
One thing is sure though - that there won't have been any burglars around there for the past couple of years. Who in their right minds would want to fight their way through that little lot for whatever it is that I have stored in the house?

6- This is another shot of what is supposed to be a communal path, and this is what I am supposed to cross in order to get from my barn to my house. It's quite evident that no-one from the commune is exercising their authority in making sure that I get my money's worth from the taxes that I'm paying. As I said, I shall have to take some positive action.
One positive side of this is the fact that no-one is ever likely to want to pass this way if this is what they have to fight their way through to get to me.

7- This is also some more communal path that leads up to my house. The barn is to the left of this photograph. I'm not sure how many Japanese snipers were hiding out in that jungle there, but I wasn't in the mood to clear it all the way back just to find out.

8- This is the barn with the overgrown communal path outside it. I've managed to fight my way out of the rear door, but only for the simple reason that there's a concrete pad just there (although you'd never suspect it from the amount of weeds that I had to clear away).
Compare this photograph with this one from 2003 and you will see what I am striving for. It really ought to be quite easy once you have done it once, but somehow, I seemed to quail at the effort.
9- I just had to take this pic of one of my conifers. I can't believe that when I planted them 4 years ago that they would even survive, let alone get to this height. There's going to be a famous hedge here in due course once next spring starts to arrive.

10- I finally managed to hack my way along the back of the barn with an old scythe. The only fuel that was lying around was some rather stale petrol so it ruled out using the brushcutter. Mind you, I'm not sure that the brushcutter would have been any quicker cutting a swathe through this lot.
The temporary doors that Paul and I built 5 years or so back are holding up extremely well and I'm impressed by them, that's for sure. We did a good job with those.

11- I also managed to hack my way down to the orchard gates too, as you can see. I actually went back afterwards and counted the brambles that I had cut away. There were probably no more that 20 - but they had rooted and shot off in every direction possible and that was why the coverage looked so impressive.
What was even more impressive was that in 2003 I had left a vine in a plant pot growing outside the front door. Much to my surprise, it was still alive, but there was an enormous bramble growing out of the pot as well.
I'm also going to have to oil the doors, I reckon. They are starting to get that weatherbeaten look now.

12- Well, as you saw, I've hacked my way down to the orchard gates, but that's about as far as I got. There's going to be quite some work to do so that I can get any farther down. I spent about a week back in May 2003 getting it all cleaned and tidied up, and it really is hard to imagine that three years of growth has produced all of this.

13- If you look in the distance, you can just about make out a Passat door on the back of the old Transit. Can you imagine that just three years ago, the view through this door would have looked something like this?

14- The solar shower area is still standing, even if it is "only just". The nozzle off the solar shower bag seems to have disappeared and the solar water tank has disconnected itself. Still, who needs to wash anyway? I came here to work.

15- I did mention that the big DiY supermarket in the area was selling marine-quality chipboard sheets at 5 Euros 50 each. What with a leaky barn roof and a pile of electrical equipment, I reckoned that if I fitted a real floor on the beams that go across the first level of the barn, there would be a handy waterproof shelter for everything downstairs at ground level. 40 sheets would cost me about 120 quid, and I couldn't get protection much cheaper than that.
The problem with having the Escort here rather than the LDV is that it doesn't have the same carrying capacity. I made a couple of trips bringing 20 sheets with me each time, together with some planks of wood and polystyrene to make my insulated battery box , as well as a few other bits and pieces. I could have done it easily in one trip with the LDV so I'll have to sort the LDV out for October as I'm going to be bringing a great deal of stuff down with me.

16- This is what the barn floor looks like - old planks and old pallets lying all over the place. Pretty dangerous to walk on, and things keep falling through. This is how the rear windscreen on the Princess was broken. High time it was all pulled up. I hate chipboard - it really is the devil's invention - but until I can get some real planks of wood then it will have to do, and it will be a great improvement.

17- This is the reverse angle shot from the above. As you can see, the floor is a right mess.
If you look carefully at the enlarged photo, on the left margin at centre height you'll see one of the American sockets I'm using for my 12-volt power connections. Plugged in, using an American plug, is a cigarette lighter socket (I wish I could get rid of those for ever) In the plug is a DC converter, into which is plugged a pair of 9 volt computer speakers that Tainea donated to the project and which you can see in the photograph. And plugged into the speakers via the headphone socket is a really cheap 1GB mp3 player, with about 25 hours of music all loaded up at 64bps.
Yes folks, a real hi-fi system. It is really nice to listen to some decent music when I'm working. I bet bands like the Outlaws and Widespread Panic have never been played in the Auvergne - and certainly not at the volume that I have been known to play them.

18- This is what the barn floor looked like when the covering was removed. You can see some water stains on one of the beams from the leaking roof, and you can also see downstairs to some of the material that has accumulated down there over time. Flooring on here is going to be a great improvement.

19- Now this is what I call an interesting photograph. You can see how the floor is going to look with the chipboard laid on top of it. That has to be an improvement.
You can see plugged into the 12-volt socket an enormous length of American orange cable. I can't remember if it's 30 metres or 50 metres, but it was certainly long. It's also top-rated cable rated at (if I remember correctly) 50 amps over all its length too. I don't remember how much I paid but I was so amazed at the price that I bought two of them and brought them back from the USA in my hand luggage. I haven't seen 50 amp cable at the price I paid anywhere else in the world.
A while ago I bought a cheap 12-volt battery-powered drill but after a short while the battery stopped holding a charge. Throwing the battery away, I attached some cables to the battery connectors and a plug on the other end, and then plugged it into the extension cable. It's not highly powered and doesn't have a great deal of torque, but it drilled all the holes in the wood and screwed the screws down afterwards, so I can be grateful for that. It made me think that I have a really old 9 volt drill lying around, and I wondered if putting 12 volts through the motor would increase the power and the torque. It's worth a try because the drill isn't likely to ever be doing anything else.

20- Here are all the essential components of one of my legendary pesto jar lamps. There's a pesto jar, a small mounting bracket, a chocolate-block connector and the top of a tin can. Apart from some cable, a bulb and a bit of hardware, all that you need is right here.

21- Here's one I made earlier. The tin lid is cut shaped and bent to make a reflector, and is fastened by a long screw that passes through one of the holes in the mounting bracket and the jar lid, and which is ultimately screwed to the wall or a beam or anything else that's handy.
The other hole in the top of the mounting bracket is enlarges slightly and drilled through the jar lid, and the cable is passed inside. The cable is then fastened into the chocolate block, which is then bolted onto the mounting bracket.
The legs of a capless halogen bulb are widened slightly, and inserted in the other rnd of the chocolate block and the screws tightened gently.

22- And here's a halogen lamp all installed and working. You can see the light switch too, and underneath, out of shot, is a 12-volt socket. There's another halogen light fitted directly opposite so all in all there's a total of 20 volts. Not very much, I agree, but ideal for background lighting.
This is because I had a lucky find in the local Auchan. 36-watt 240 volt 1200mm flourescent striplights at less than 10 Euros each. That's the equivalent of about 250 watts of light. There's 9 of them now sitting in the barn, and the idea is to hang one of them up in each of the bays (I make that about 6 that are needed). When the inverter is installed permanently and there's some kind of mains circuit, I can have the lamps hanging in the bays on flying leads, and just plug them in as and when required to make some really impressive work lighting using the equivalent current requirement of a couple of halogen lights. With the remaining lights, I can make a few portable worklights.
A good solar panel, a good battery, a decent inverter, and my whole life has suddenly changed. I'm going to change the flourescents down to 18 watt tubes though, despite the new improved electrical system. I just don't know what I would do with the equivalent of 250 watts of incandescent lighting.

23- I was so engrossed in working that I had piles of tools, equipment, hardware, books, papers, everything, all over the new barn floor. It would have taken me a week to put it all away so instead, I hung one of my enormous tarps to protect everything from the rain that leaks in through the roof. When I came back in October, everything was just fine.
The barn floor is laid up to the vertical beams, meaning that I've done about half of it. The barn is off-centre so the panels at all four edges have to be trimmed. The 18-volt circular saw is just so impressive for this but the battery goes flat after about 15 feet and takes about four hours to charge up. The 18-volt rough-cut saw lasts longer but takes much more effort to cut. The 12 volt battery-powered jigsaw takes forever but is useful for cutting round peculiar shapes and protrusions in rough-cut beams. However, I have a 350 watt mains jigsaw and a 400-watt mains alligator saw in Belgium and they'll be coming with me in October.
As well as that, I had to fit a beam in against one of the walls to take the flying edge of the panels, as it was impossible to get both edges to butt into the wall, and there were countless other tasks that I came across as I was working.
The next half of the floor passes over where the door is downstairs so when I do this, I'm going to put a trapdoor in the floor and a pulley overhead, so I can get large things up from downstairs without having to struggle with them up the stairs or round by the caravan.

24- I also spent some time tidying up the wiring in the barn. I don't know just what I was thinking when I did it originally, and there's still plenty of room for improvement. It's all American 110 volt plugs, and American sockets now as much as possible, in the barn.
While I was in the USA, I came across some waterproof exterior socket mountings, so I treated myself to half a dozen, and I've now installed one outside the barn in the area that I'm planning to use for parking a touring caravan. With the long extension cables, I reckon I can get 12 volt power quite a way outside now.

25- I put the batteries behind the caravan upstairs as a temporary measure. They're all properly wired in and connected, with the input and output cables diagonalled so that current going in has to circulate through alll of the batteries, and current going out has to do likewise. It means a slight reduction in current, but it equalises the charge and prolongs the life of the batteries.
I put a piece of barn floor over the top, and this is the charging station for the battery tools. The grey flying lead you can see is for the inverter or any other high-power battery-operated equipment that needs more than 2.5mm cable. There are a few dotted around the barn, and one or two in each of the vehicles.
The power out is currently channelled through the auxilliary wiring circuit of (thinks) a big Rover. One nice thick cable running into a four-fuse box (one at 30 amps and three at 60 amps) each with their own output wire. Tailor-made for my temporary system. When I have the permanent system though, I'm going for circuit breakers and I'll use this wiring set-up in my new truck.
You can also see the junction box that takes the current from the small wind turbine through to the house. But I've disconnected it and put the wind turbine through the controller for the large batteries. This is because I've brought the solar panel inside now I'm not there, and the wind turbine will keep some charge circulating through the batteries.
The really thick black cable is some 10mm two-core cable I pîcked up on special offer and which I connected to the solar panel. You can get a better view of this outside in image 04.

26 - So, here I am again. This time, it's October but due to a change in plan, I'm only here for 17 days. And real lucky I was to get here too! On the Boulevard Peripherique around Paris, there was a loud "bang" from underneath the van and, no clutch. So what do you do without a clutch in the midlde of the Boulevard Peripherique? Well, you just keep going without the clutch! Good job I know how to double de-clutch for changing down, and "feel" the gearbox for changing up.
Coming to rest was no problem either, I just slid the gearbox into neutral and coasted up to the tolls, or the diesel pumps or whatever. To get under way again, I switched off the engine, put the van into gear, turned the key, and kangarooed off until the engine fired, then foot down and away! This was extremely interesting when I had to try it in reverse gear!
It turned out that the bolts holding the clutch cylinder had fallen out, and the clutch cylinder had fallen off. Next morning, at the side of the motorway after a few hours sleep, I dismantled the van until I found two bolts the right size, and screwed it back on. It took ages to bleed, and I couldn't get it right, so I set off regardless. And after a while, it seemed to have bled itself and it worked fine after that.

27 - Forget the English football fans with their "three lions on my chest". As you can see, I have three solar panels on my roof. Bully for me, hey? I'm here for serious work. You can see that my panels are Sharp ND-L3EJE 123 watt panels. Googling the panels brings up some really good reviews and I'm glad my friend John Bannen recommended them.
But I could never understand why the fans of "Ingerlund" would want three lions on their chests. Why can't they be like me and be content with one dragon on the floor?

28 - First job after unloading the van was to build the battery box that I had promised myself. Here, you can see it about half-finished. It's made of a piece of chipboard floor with some battens, and some odds and ends of planks from when Paul and I built the barn doors in 2000. I've coated it with used engine oil, as is my wont, and lined the inside with polystyrene to insulate it as much as possible.
People often ask me if I'm aware that used engine oil is toxic. Well, yes I am, and that's why I use it. The amount of woodworm, termites and other noxious beasties that you get round here that munch their way through the woodwork, you need something pretty noxious to take care of them. And one chemical is just as good as another, and at least this way it's recycling something that otherwise would need a special disposal.

29 - One of the problems of having this sealed battery box is that there will be a risk of build-up of gas as the batteries charge up. To get round this, I've installed a ventilator fan made from an old computer power supply fan. I'm planning to connect this up to the live side of the charging circuit so that it switches on when the batteries are charging, so that the gases are extracted.
You'll notice that there's a funnel to channel the air out. This is made from an old tin can, in much the same way that the Prisoners of War would make a tube for air extraction - the old "klim tin" method.

30 - Once the battery box was something like, I started to build up the backboard control panel to which I was going to attach everything. As you can see, there is the 600 watt inverter on the left, connected by a flying lead of 6mm profile in case I want to connect up anything else heavy duty there, and with a fuse in line. There's a meter plugged into the inverter, and into this is plugged a lead to a four-gang mains junction box. One thing that I found was that there was an incredible power drop the farther away I mounted the inverter from the batteries. It seems to be essential that it is sited as close to the batteries as possible.
To the right is the Xantrex C40 charge controller for the solar panels, and then lower left is the fuse box for the 12-volt circuit. In there is a bus bar for the negative circuit, and the Rover fuse setup for the live circuit. These are ultimately going to be changed for circuit breakers.
You'll see that the battery - live circuit connections consists of through-bolts with wing nuts, for easy attachment and detachment. I'm not sure how I can do this any better given the circumstances under which I'm working. There is a 100-amp circuit breaker for disconnecting the battery supply.

31 - The battery box is lined with cheap scrap hardboard from some old signs that I liberated from someone's garage. Nothing goes to waste with me.
One thing about having mains power now - albeit 600 watts only - is that I can use power tools!! This is a Black and Decker "Scorpion" 400 watt electric saw that made short work of cutting the hardboard. I bought this saw for about €30 because there was no box and only one blade. When I was in the USA in 2005 I was lucky enough to pick up a spare wood-cutting blade and later a complete set of blades at a price that can't be beaten anywhere else in the world.

32 - And it wasn't just alligator saws or sabre saws or whatever either. Paul found for me a cheap electric drill that drew a mere 300 watts of current. Now this has to be better than 12-volt drills for pounding my way through battens and for drilling into brickwork.
You can see that I'm using British plugs and sockets for the low-wattage 230 volt stuff running off the inverter. This is because the British plugs have interchangeable fuses in them, so I can quickly change them over to 3-amp fuses instead of the standard 13-amp fuses. This will protect my equipment and appliances much more effectively than relying on a central fuse wired into the circuit.
You know, I am really amazed at how my whole life has advanced since I fitted up the new solar panels and the batteries and the inverter. Like I said, I should have done this first back in 1999 rather than leaving it until now. How much easier my life would have been.

33 - Having completed the battery box, I finished off the backboard control panel. You can see the four-gang mains junction box, the cover on the 12-volt fuse box, and the second Xantrex Controller (this one a C60) for the 500-watt wind turbine when I fit it next spring.
There's a really fine 12 volt 50 watt worklight you can see in the photo. I bought that in the USA from a dollar store in 1999. I'd forgotten I had this lamp, and came across it while I was in the house looking for something else. There was about 20 feet of cable attached to it, so I coupled it up to a cheap lightweight 15 foot extension cable that I bought in 2002 from Home Depot (now isn't that a surprise) in Loveland, Colorado and which was just lying around because I didn't know what to do with. Now, I can get light all around the lower side of the outside of the barn.

34 - So, having sorted out the basic bit of the wiring, I tried an experiment. I took one of the solar panels I'd brought down with me, and just stood it on a chair. It's suitably anchored with a rachet strap, and suitably weighted down with some bricks, as you have no idea how windy it was out here by now. I'd actually at first tried to fasten it to the wind turbine pole with some exhaust clamps, but struggling up a ladder dragging the panel, the cable and the mounting bolts, and then standing up on a ladder in the wind trying to fasten it all on totally defeated me unfortunately. This is going to be a "scaffolding" job, I reckon.
What I was trying to do was to see exactly what kind of current I could be expecting from the sun at this time of year, and to see whether it was all going to live up to expectations. The proof of the pudding, so they say, .....

35 - Now I had two solar panels lying horizontally on the roof of the Transit, and at about 15:00 they can usually struggle up to about 36 watts. In the morning, there was little if any current. Consequently, I reckoned that whatever current I would get in the morning would be almost all from the solar panel out at the back.
""Look at that! Ohhh look at that!" (to quote the words of John Motson). And look at that indeed! 124 watts, and I reckon it's almost all coming off this solar panel outside. Now this is really what I call impressive! (and it even reached 136 watts just after I took the pic. Not bad for a 123 watt solar panel). This is progress with a capital P.

36 - So now that we know that the principle of the system works, the next step was to make everything more permanent - and this involved wiring. As you know from many of my previous projects, although I can "do" wiring, it usually ends up like two plates of spaghetti by the time I finish. This is where I'm going to have to be ultra-careful.
The two thick (25mm) conduit pipes are for the power in from the solar array and the large (as yet uninstalled) wind turbine. The cable in here is 10mm profile. The four smaller (20mm) conduits are for the mains power. As you can see, they are labelled "mains light" and "mains power" for upstairs, and ditto for downstairs. Each one of them is fused from the 4-gang junction box. There's 1mm cable for the lighting circuit, and 1.5mm cable for the power. 5 amp maximum power and half a dozen 18-watt flourescent lights isn't going to involve a significant power drop.
Here, though, I've made just a little mistake - well, not a mistake really, but I could have done better. The conduit is also available in black, and I should have bought black for the power and used white for the lights, to help me distinguish it better. How easy would that have been when I'm cutting my way into cables?
The cable for the 12 volt circuit is just freestanding. This is 2.5mm profile, to eliminate any significant power drop.
By the way, if you want to criticise anything I've done, or make some suggestions to improve things, then please feel free to . I'm pretty much groping in the dark for much of this. As you know if you've read the previous pages, my early attempts at wiring were pretty much shambolic to say the least, and it's only with feedback from other people (notably Paul) that I'm making any sort of improvement. I welcome your comments.

37 - Feeding the cable down from upstairs into the circuit meant of course that I had to feed it from the top. To do this meant inventing a patent wiring roller with all the cable. So here you are, in glorious technicolour, my patent wiring roller. You have no idea just how easy it was feeding the cable downstairs with a contraption like this.
"Every Home Should Have One", said Marty Feldman, and I thoroughly agree.
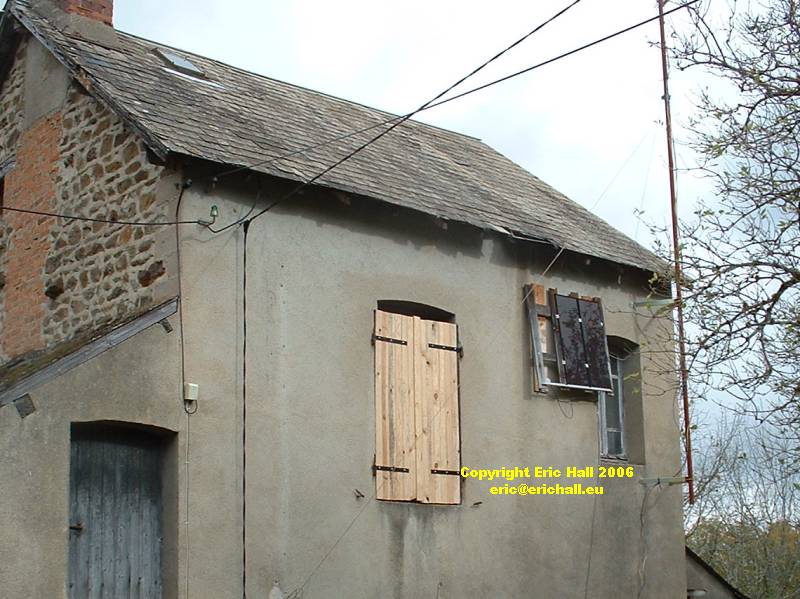
38 - So having done the electrics as far as I could, just one more task remained before I went home.
One of the panes of glass in the upstairs window of the house was broken. Ordinarily I'd have taken the window out and fixed it, but if I'm going to be working on the roof next spring, there's always the risk that I might break it. Anything's possible where I'm involved. The big DIY place in Montlucon (which incidentally is part of the British B&Q chain) was selling some low-quality tongue and grooving for a few Euros a square metre, so I bought a pile of it, and made myself some shutters to keep out the weather.

39 - Just one final thing. Scavenging around in the bins in a clearance sale in a supermarket some time previously, I came up with this. Now isn't this superb?
It's a 12 volt lighting controller that comes with a dusk-dawn sensor, and a four-position switch that gives the option for the pir (included, as you can see), full dusk-dawn operation, or a choice of first three hours of dark or first 6 hours of dark. It's an absolutely amazing find, isn't it?
I've found some 5 watt capless halogen bulbs from IKEA in Milton Keynes, and I'm going to assemble some pesto jar lamps and have one in the barn at the top of the stairs and a couple more outside, so I can run them through the night. I reckon with my new solar array, I can afford 15 watts of power through the hours of darkness.
It's a Ranex VL10, if you want to search the web or eBay to see if you can find any more. If you do, find another couple for me.

40 - Well, that was supposed to be all. But shops have a habit of turning up some remarkable things that would go down really well on the farm. B&Q at Meir Park, Stoke on Trent came up with this rather nifty heater. It's rated at 200 watts with a thermostat (that seems to work) and claims to have a frost control. And all for £9.95 too. I'm going to wait until the weather gets really cold, and then take it outside here to see if the frost control really works.
Next step will be to connect it up to the small inverter and then plug it into one of the battery packs I have lying around here, to see how long it would last trying to heat a certain volume up to a comfortable temperature. If I can get a few hours out of it, then it moves this idea of sleeping in the van in the middle of winter into a completely new dimension.
Sleeping in a tent inside the barn in winter is likewise going to become a comparatively attractive option too if it works.

41 - And that's not all either. This little gem came from either Aldi or Lidl (can't remember which). It was a little expensive - about £12.95, I think, but what it is is a 230 volt lamp with pir movement detector. While these are normally two-a-penny, what is attractive about this is that it takes low-energy bulbs, and I have never seen those on sale before.
Imagine - with a 5 watt low energy bulb, which is about 35 watts of incandescent power, lighting up as I move around inside the barn. I usually have the inverter on at night to power the laptop when I'm on the internet anyway, so for an extra 5 watts of power to light my way around as I struggle to the chemical toilet or to find something I need, well, it has to be worth a try.
Paul and I gave it a brief run out to make sure that it works, and it seems to be okay. A trial down on the farm next spring, and if it does the job, I can see me getting a couple more of these.
It seems to me that the market is starting to explode with items that are suitable for the farm and the lifestyle I've chosen. I remember being ridiculed by some friends on a Land Rover newsgroup because I wanted to live with "all mod cons" (I was talking about the feasibility of running a microwave oven, as it happens, which isn't so ridiculous when you consider that you can buy ones to work in cars and trucks) but I'm convinced they'll be all eating their words by the time I'm actually down there full-time in spring 2008.
Ordinarily, I'd get pretty fed up about the constant sniping and criticism, but I found it absolutely hilarious that Land Rover owners are trying to lecture me about energy use. The irony goes completely over their head, as you might expect.
Return to the photo gallery.
home page | latest updates | site map | site index
about this site | audience participation | copyright notice | technical issues | accessibility statement | read this | contact me
©